 1-888-553-8776
Creating Your First Shopify Theme Section

Creating Your First Shopify Theme Section
Give Your Client Control
Client’s really like having creative control when they want to customize their store. Certainly, you can please your clients by ensuring they have creative control. Therefore; using Shopify’s section options are powerful tools that will enable your client to personalize their site.

User Experience
User-Friendly Sites Provides Positive Experience For the Consumer
Most noteworthy, customers demand a user-friendly experience. It doesn’t matter whether you’re building a Shopify theme from scratch or modifying a them for a client. You still need to develop different types of sections, which will vary. Besides that with blocks, you can move into a curator role and give the merchant the choice to decide what kind of content they host and where it appears. Additionally, this gives the clients control.
Theme Sections

Let’s examine how to get started with creating different types of theme sections. This will make sure that you can help empower your clients in this article. We will show you how to give control of customization of their store to your client. We will look at two functional examples of blocks, and explore the different ways you can unlock their potential.
What are theme sections?
What Are Theme Sections
Modular, customizable elements of a page are called sections. Sections can have specific functions. Sections can be statically included in a theme’s templates (like the header and footer), or they can dynamically added to the theme’s homepage from the Theme Editor.
Making a static section in your Shopify theme.
The static section is a fixed component which can be customized through the Theme Editor. In this section, the position on the page is locked, based on where its been assigned within the page template. Look at it as a kind of like a snippet, but with more capabilities. Sections are added into Liquid templates with the variable {% section ‘header’ %} instead of {% include ‘my-snippet-file’ %} .
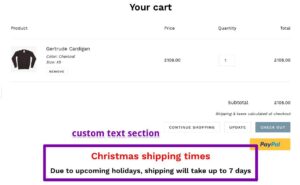
lients Can Add Custom Text To Their Cart Page
You can allow clients to add custom text to their cart page. This would be great for merchants whose shipping times change seasonally, as it allows you to add shipping information.
Shopping Cart Shopify
By creating a section that allows clients to add custom text to their cart page, this would be very useful for merchants whose shipping times change seasonally.
Creating A New Section From The Theme File Editor

Creating a new section from the theme file editor, a scaffold is automatically created with schema, CSS and Javascript tags. Within the schema tags we would add JSON, which would define how the Theme Editor “reads” our content. The CSS and Javascript tags can be used to add styling or functions specific to this section. However; by default the section will pull its styles from the main stylesheet of the theme.
Adding Content To A Section

To add content to a section, you have to add HTML and Liquid tags to the very top of the file. Your Liquid tags can be defined within the schema, so the section can be customized in the Theme Editor. You can see the different values that can be added to the schema settings in our documentation.
Example
{{ section.settings.text-box }}
{{ section.settings.text }}
{% schema %}
{
“name”: “Text Box”,
“settings”: [
{
“id”: “text-box”,
“type”: “text”,
“label”: “Heading”,
“default”: “Title”
},
{
“id”: “text”,
“type”: “richtext”,
“label”: “Add custom text below”,
“default”: “
Add your text here
”
}
]
}
{% endschema %}
{% stylesheet %}
{% endstylesheet %}
{% javascript %}
{% endjavascript %}
In the section in the example above, we’ve created a section called text.liquid. This has a customer heading as well as a custom rich text box. You can see that the Liquid tags in the HTML correspond with the settings in the schema section. In this example, we created a plain text box and a richtext box. However; you can add a wide range of output types, depending on your client requirements. Other valid input types include image_picker, radio, video_url, and font.
Within the settings of schema, id refers to the Liquid tag being defined, type is assigning the kind of output we are creating. Label is defining a name for this output and default is assigning a placeholder.

Shopping Cart
Adding Text Box Section On Cart Page
If you want this text text box section to appear on the cart page, I will need to add {% section ‘text’ %} to the cart.liquid template file. This works similar to how you would add a snippet to a page template.
{% comment %}
The contents of the cart.liquid template can be found in /sections/cart-template.liquid
{% endcomment %}
{% section ‘cart-template’%}
{% section ‘text’ %}
We now move to the Theme Editor and go to the cart page so we can see this section appearing below the main content of the cart page, and above the footer. This is what the output should look like.